Budbee for WooCommerce – Introduction
Budbee for WooCommerce is a plugin that extends WooCommerce, allowing you to book shipments via Budbee.
- Budbee is available in Sweden, Denmark, Finland and the Netherlands.
- You need an agreement with Budbee to be able to use this plugin.
- WooCommerce 3.8 or newer is required.
- PHP 5.6 or higher is required.
- A SSL Certificate is required.
- The plugin can be downloaded here.
Installation
- Login to WordPress Admin. Navigate to Plugins → Add New (in the left column menu).
- Click Upload Plugin and then browse to the plugin zip-file on your computer. Click on OK and finally click on the Install Now button.
- Activate the plugin.
Configuration
- Go to: WooCommerce → Settings → Shipping.
- Now Budbee is displayed as an available option in the horizontal menu at the top. Click on this link to access the Budbee settings.
Basic settings
- API key - Your API key that you will receive from Budbee once you have your agreement.
- API secret - Your API secret that you will receive from Budbee once you have your agreement.
- Collection ID - Your Collection ID that you will receive from Budbee once you have your agreement.
- Sandbox mode - Enables so that you test the plugin before going live. (Requires separate test credentials).
- Debug mode - Log events in the module. You can find the log by navigating to WooCommerce → Status → Logs.
Order management settings
- Budbee booking - Enables the plugin booking functions.
- Automatically open shipping labels - Automatically opens all shipping labels in new tabs when booking orders via “Bulk Actions”.
- Choose order status on orders Booked or Cancelled with Budbee - Enables you to choose what order status you want on orders Booked or Cancelled with Budbee.
Recipient settings
- Outside door - Enabling this will allow Budbee to leave the package outside the door if recipient is not at home.
- Require signature - Enabling this will require recipient to make a signature when receiving the package.
- Identification check required - Enabling this will require recipient to show identification when receiving the package.
- Recipient minimum age - Enter what the minimum age requirement is for recipient. Leave blank for disable this setting.
- Recipient must match end customer - Enable if the the recipient must be the same person that created the order in your store.
- Number of miss retries - Enter how many times the recipient are allowed to miss deliveries. Leave this field blank to allow infinite time of misses.
Creating and configuring a Budbee shipping method
- Go to: WooCommerce → Settings → Shipping → Shipping zones.
- Choose or Add the Shipping zone where you want to add Budbee as a shipping method.
- Click on the Add shipping method button.
- Select one of the available shipping methods. Do not select Budbee - this method is a legacy shipping method that will be removed in future versions.
- Click on the created shipping method to configure its settings.
- In the configuration screen a setting called Budbee Service is displayed. This setting defaults to No Budbee Connection.
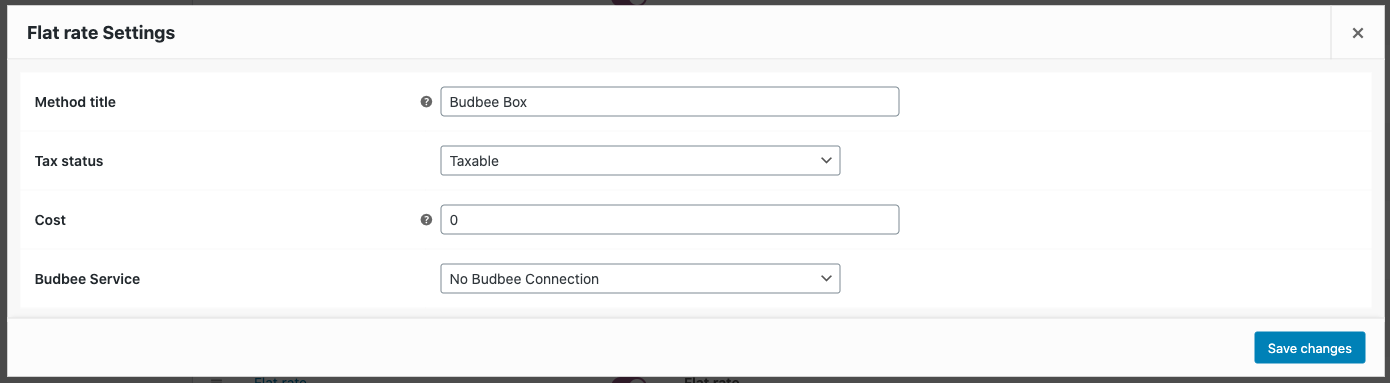
- By opening the select box you can choose the shipment service you want to connect. Budbee Home and Budbee Box are the available services.

- Remember to add a Method title, Cost and Tax status for the shipping method.
- Click on the Save changes button.


How the plugin functions in cart/checkout
Budbee Home
By default the Budbee Home shipping method will be displayed in the cart/checkout. When the customer enter their postal code, the plugin run a control on the given postal code and country, whether it is within Budbee’s delivery range or not. If the given postal code is within range the plugin will continue showing the Budbee Home shipping method for the customer. If the given postal code is not within range, the plugin will hide the shipping method for the customer.
Budbee Box
By default the Budbee Box shipping method will be hidden in the cart/checkout. When the customer enter their postal code, the plugin run a control on the given postal code and country, whether it is within Budbee’s delivery range or not. If the given postal code is within range, the plugin will display the Budbee Box shipping method together with a selectbox with available lockers.
Order management
To be able to manage Budbee orders, you will need to enable the Budbee booking setting in the module settings. Only orders made with Budbee as the chosen shipping method will have the accessibility to book or cancel orders via Budbee.
To be able to see the status of a booked or cancelled order, you will need to go to the specific order. The status will then be displayed in either the Order notes or in the metabox of the order.
To be able to control what order status a booked or cancelled order should have, enable the setting: “Choose order status on orders Booked or Cancelled with Budbee”.
Book Budbee Shipping
- Navigate to WooCommerce → Orders.
- You can book a Budbee shipment in multiple ways.
- Clicking the truck icon located to the right when viewing all orders, check the Actions box in Screen Options if you do not see this icon.
- Selecting the Book Budbee shipping option in the WordPress Bulk Action drop down menu.
- Navigating to the specific order and clicking the Book Budbee shipping button located inside the metabox to the right.
- If an order was successfully booked, the order note will display “Budbee order created.”, along with other information such as order id, shipping label and tracking URL.
- If you need to grab the Budbee booking data for other purposes, it can be found in the following post meta fields in the order:
Tracking url:_budbee_tracking_url
Shipping label:_budbee_shipping_label
Locker ID (Budbee Box):_budbee_locker
Full locker data (Budbee Box):_budbee_locker_data
Cancel Budbee Shipping
- Navigate to WooCommerce → Orders.
- Navigating to the specific order and clicking the “Cancel Budbee shipping” button located inside the metabox to the right.
- If an order was successfully cancelled, the order note will display “Budbee order cancelled.”
Print shipping labels
After you have booked a shipment you are able to print the shipping label directly from WooCommerce.
Single shipping label
You can print a single shipping label from the orders page as well as from the single order view. To print the label directly from the orders page click on the Budbee Shipping Label icon in the actions column. The label will be opened in a new browser tab.

Multiple shipping labels
To print multiple shipping labels in one sequence you can use the Bulk action Print Budbee shipping label.
- Mark the orders that you want to print.
- Select bulk action Print Budbee shipping label.
- Click on Apply.
- A PDF file will now be downloaded to your computer.
